
Transferring a Webflow site involves transferring ownership of a project from one Webflow account or workspace to another. This comes in handy when passing on a client project or working with another team. Though most site components transfer without a hitch, there are some important changes and restrictions to note. Below are essential points to grasp what occurs during and after a site transfer in Webflow.
Hosting Plans Do Not Get Transferred
Upon transfer, a site does not transfer along with its hosting plan. If one needs to post the site to a custom domain, one needs to set up a fresh hosting plan by himself/herself.
CMS and Content May Be Impacted
CMS content and collections will stay behind with the site, but the account into which it receives must be CMS-capable (e.g., a CMS plan or above) in order to view and edit them correctly.
Site Backups and Version History Stay
Version history, backups, and design assets for the site all carry over with the project. The owner can restore old versions and view assets without restriction.
Team Members and Permissions
ResetAny user roles, team member access, or collaborator permissions associated with the original workspace will be lost. The new owner will have to redistribute team roles and invite collaborators once more.
Billing and Invoices Remain with Original Owner
Prior billing history and invoices concerning the moved site remain in the original owner's account. The new owner begins a new billing cycle when they add hosting.
Where to initiate the transfer
- Go to your Site settings
- Click the transfer icon
How to transfer a site to another user
If you want to transfer
your Webflow site to another usersuch as a client colleague, or other account—you can do so with ease directly from your dashboard. This is particularly handy if you've completed a project and want to pass it off, or if you're working with someone who needs complete control of the site.
To begin
log in to your Webflow account and navigate to your Dashboard. Locate the project you wish to transfer, click on the gear icon and then select Transfer to another account from the menu. You will be asked to enter the recipient's email address. Ensure it is the one they use for their Webflow account. Upon confirmation, your site, including design, CMS content, and assets, will be transferred to their account.
However, your hosting plan
does not move, so the new owner will have to establish their own plan if they desire to publish the site to a custom domain. Also, when you finish the transfer, you will no longer have editing rights unless they re-invite you.Always alert the new user beforehand before transferring your project for a seamless, secure handoff and to avoid any unforeseen confusion.
Moving a site
to another Workspace in Webflow enables you to better structure projects, work with teams, or even client work within the proper framework. Whether you're grouping your projects together or exporting a site to a team setup, the action is fast and easy.
First, log in to your Webflow account
go to your Dashboard. Locate the project you wish to transfer, click the gear icon (Settings), and then choose Transfer to Workspace. A dropdown menu will show you the Workspaces you have access to—select the one you wish to transfer the site to. The site will then transfer to the chosen Workspace once confirmed Remember, your site design, CMS content, and assets will migrate, but any hosting plan associated with the site won't migrate with it. You or your team will have to buy a hosting plan under the new Workspace if needed.Also, after the transfer is done, your individual permissions can be altered based on your role in the destination Workspace. Be sure to coordinate with your team or Workspace admin so that you have the appropriate level of access.
Transfer a site to a Workspace on another account of yours
Finish the Transfer
Approve the transfer, and the site will be visible in the chosen Workspace. Keep in mind that hosting doesn't move, so you'll have to buy hosting again in Transfer a Site to a Workspace on Another Account of YoursIf you have multiple Webflow accounts that you manage, you can transfer a site from one to another by sending it to a Workspace owned under another account you manage.
Access Site Settings
navigate to your Dashboard, open Project Settings, and choose the "Transfer to Workspace" option from the Settings dropdown.
Choose Destination Workspace
choose the Workspace associated with your other account. Ensure you're an owner or have transfer rights to that Workspace.
Transfer a Site to a Workspace You’re Not a Part Of
Webflow lets you move a site to another Workspace you are not a member of, for instance, a client's team or another organization. You'll require the email address of the receiving Workspace for this. The site will then be sent to the recipient upon entering it in their account. After the transfer, you'll lose all privileges unless they invite you in again. Hosting is not transferred, so the new Workspace will have to establish its own hosting plan.
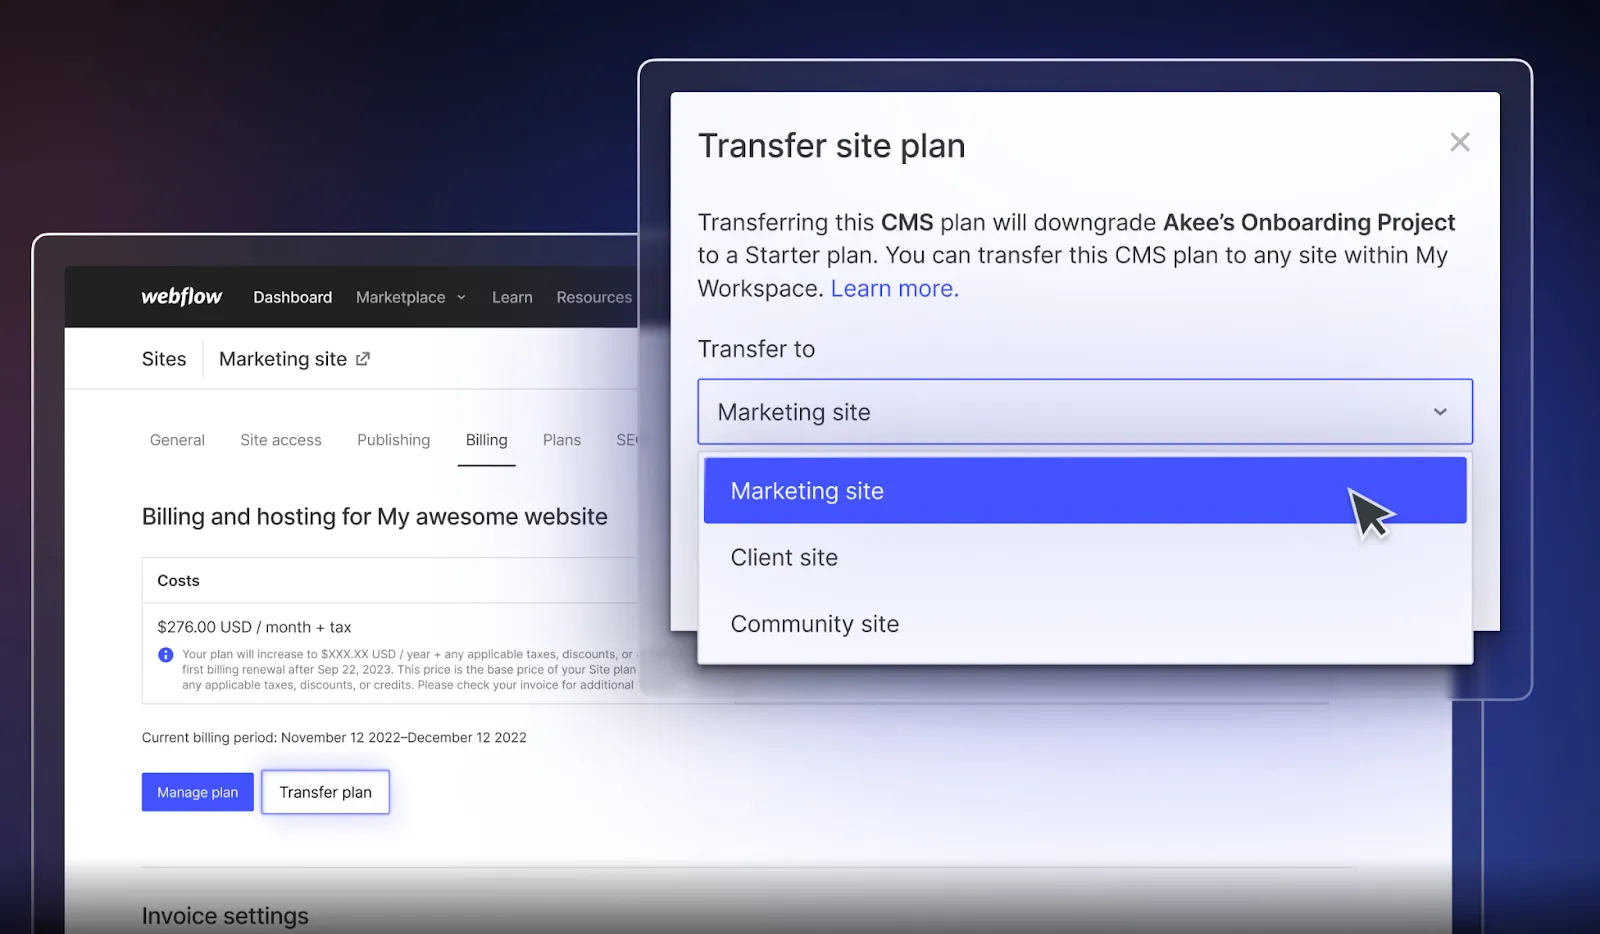
How to Move a Hosted Site with an Active Site Plan
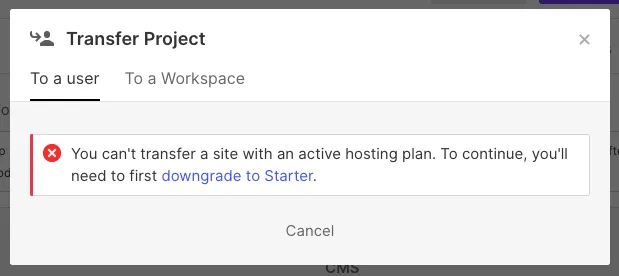
To move a Webflow site with an active Site plan, you need to initially cancel the hosting subscription. Transferring hosted sites is not supported by Webflow because of billing constraints. Navigate to the Billing tab within your project settings, cancel the Site plan, and let the cancellation process work. With hosting no longer active, you can transfer the site normally to another account or Workspace. The new owner will have to host again after transfer.
Transfer a duplicate of the site
Create a Duplicate
in your Webflow Dashboard go to the three dot menu on the project and click on Duplicate to make a precise replica of your site, including pages and CMS content.
Open the Duplicated Site
After duplicating, open the new site from your Dashboard to implement any changes or adjustments required before moving it to another user or Workspace.
Cancel Hosting
If the original site was hosted make sure the copied version is not. Webflow does not support transferring sites with active hosting plans.
Transfer the Duplicate
In the duplicated sites Project Settings, select Transfer to another account or Transfer to Workspace based on your requirements. Input the correct email or choose the destination Workspace.
Confirm and Notify Recipient
Finish transferring by checking to confirm the action. Inform the new owner that its a replica so that they know it might need to be reconfigured for hosting or CMS modifications.
Transfer the original site
Cancel Active Hosting Plan
Before transferring the original site, cancel any active hosting plan. Webflow doesn't allow site transfers with an active Site plan because of billing procedures.
Open Project Setting
From your Dashboard find the original site and click on the gear icon to open Project Settings. This is where the transfer option can be found.
Select Transfer Option
In the Settings panel select Transfer to another account or Transfer to Workspace based on the destination where you would like to transfer the site.
Enter Recipient Details
Enter the recipients Webflow email or pick the destination Workspace. Ensure that the destination Workspace or account is ready to take in the project.
Confirm Transfer
Complete the transfer. Once done the original site will be completely moved and you will no longer have access unless brought back. The new owner will need to install a hosting plan if required.
How to Move a Made in Webflow Site
To transfer a Made in Webflow site, first duplicate the project from your Dashboard by clicking Duplicate rom the site menu. After duplicating, click on the new version and access Project Settings. From there, select Transfer to another account or Transfer to Workspace", then type the recipient's email or choose a Workspace. Hosting will not be transferred, so the new owner will need to set it up individually. You'll lose access after transfer unless you're re-invited.
How to transfer an Ecommerce site in webflow
Transferring an Ecommerce site in Webflow includes a additional steps. First you have to cancel any current Site plan since hosted Ecommerce sites cannot be transferred. Next copy the project to keep the original and work from the duplicate. Open the copied site's Project Settings choose transfer to another account or Transfer to Workspace and enter the recipient's email or Workspace. Note that E commerce configurations such as products orders, and integrations won't be transferred. The new owner will have to reconfigure Ecommerce features and enable a new Site plan. After being transferred, you'll no longer have access unless they invite you again.
Conclusion
Transferring a Webflow site to another account is a straightforward process that gives you flexibility when collaborating, selling templates, or handing off a project to a client. By using the “Transfer to another account” option in the site settings, you can send your entire project—design, assets, CMS, and settings—safely to another Webflow user. Just make sure the receiving account is ready to accept the transfer. This feature helps you stay organized and professional while keeping control of your work. Whether you're a freelancer or part of a team, transferring sites in Webflow is quick, secure, and user-friendly.
FAQ'S
How To Transfer Webflow Site To Another Account | 10 Second Guide
2. Will the content and design of the site still be intact following the transfer?
3. Will I continue to be able to use the site once I've transferred it?
4. Can I transfer a site to an individual who has not yet registered a Webflow account?
5. Does billing information and prior invoices move along with the site?
We make websites that bring joy and meet your goals.
We create digital experiences that not only capture the users but also empower businesses in a highly competitive world. We are dedicated towards developing creative solutions that will easily fuse creativity with functionality, with long-lasting effects.

