How to center an image in Webflow | 10 Second Guide

The process of image centering in Webflow may appear difficult initially but becomes straightforward when one recognizes the right tools. The correct positioning of images in your design will significantly improve your professional website development and personal project creation. Webflow supplies multiple ways to horizontally and vertically align images through flexbox along with grid functionality and manual margin configuration. Follow this guide to understand step-by-step methods for image centering in Webflow whether you are a new user or not.
Using Flexbox to Center an Image Horizontally
Webflow users should consider Flexbox as their easiest method to center content on projects. You can center an image horizontally with Flexbox in only a few simple steps according to the following process.
Select the Parent Element
Select the container element which contains your image by clicking on it (a div block) works best. The flex display settings of this parent container will serve to control the image positioning.
Apply Flex Display
Within the Style panel developers should set the parent container’s display property to “Flex” for proper execution. Through this approach you can determine the positioning of all elements contained within the parent container including the image.
Choose Horizontal Centering
Set the Justify setting to Center under the flex options. The justify value allows you to move both your image together with other child elements to the exact midpoint horizontally within their parent container.
Check for Full Width
Validate the parent container width satisfies the needs for proper image centering. To accommodate your image properly adjust the width until the parent container extends to full width.

Using Flexbox to Center an Image Vertically
Alignment of vertical images through Flexbox at Webflow operates in precisely the same way as horizontal image alignment. Primary instructions for vertical alignment of an image within its parent element can be found here.
Begin by choosing the element which contains the image:
Alignment of vertical images through Flexbox at Webflow operates in precisely the same way as horizontal image alignment. Primary instructions for vertical alignment of an image within its parent element can be found here.
Set Display to Flex
Select the display property in the Style panel and define the parent container as “Flex.” The flexbox feature becomes available when you enable Flexbox controls and allows you to position your image elements.
Enable Vertical Centering
Set the Flex layout “Align” option to “Center” under its settings. The image will position itself at the vertical midpoint of its containing parent area no matter what the parent's height size is.
Adjust Container Height
The parent element needs a specific height definition. Without it the image remains uncentered in its position. Adjust the height value by setting pixels or ratios or utilizing the viewport height measurement.
Centering an Image Using Grid
Webflow users have the option to center their images using Grid as a straightforward and adaptable method. To perfectly place your image in the center you should follow these steps for grid layout tools.
Select the Parent Container
Click on the div block since it contains your image as the parent element. The element will be transformed into a grid layout in order to position the image appropriately.
Set Display to Grid
The Style panel provides a display option called “Grid” which you should adjust on the parent container. The grid features become active when you select this option and allow you to adjust layout areas along with spacing and alignment.
Adjust Grid Settings
Your grid requires one row and one column addition. Position your image precisely in the center by selecting both “Justify” and “Align” options in the grid and setting them to “Center”.
Place Image Inside Grid
Place your image file inside the grid space. Camera will position the image at the exact center of the cell automatically because centering options are already configured in the grid.
Using Margin Auto (For Horizontal Centering)
Any image can be centered horizontally through Webflow using the margin auto technique. The method spreads equal space between the left and right sides of any block-level image element
Select the Image Element
Use Webflow to select the image that requires centering within your project. Select your image element directly instead of through its parent container to place changes specifically on the image rather than its parent elements.
Set Display to Block
Navigate to the Display section of the Style panel to enable “Block” as the image watermark. Margin auto will function correctly to center the element only after setting images to display as block-level elements since they default to inline position.
Apply Auto Margins
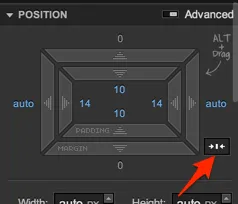
Apply “Auto” as the margin value for both the left and right sides of the image. Webflow applies the image to the horizontal center position by distributing equal spacing between its container sides.
Defining the container width
To achieve centering the image container needs a specific width defined. Having a container without width or full-screen extension should prompt additional modifications when trying to achieve centering.
Conclusion
The process of centering images in Webflow becomes straightforward after mastering the right tools. Images get aligned efficiently in layouts through the three methods including Flexbox, Grid and margin auto. Apart from horizontal and vertical positioning Flexbox performs well and Grid provides detailed control and margin auto excels at horizontal image alignment. The mastering of these design methods enables extensive control of your images for professional and sharp presentation on every device screen.
FAQ'S
How to center an image in Webflow | 10 Second Guide
2. Why isn’t your image centering even after setting margin auto?
3. Do you need to use custom code to center an image in Webflow?
4. What’s the best method for you to use—Flexbox, Grid, or Margin Auto?
5. Can you center an image inside a section or container?
We make websites that bring joy and meet your goals.
We create digital experiences that not only capture the users but also empower businesses in a highly competitive world. We are dedicated towards developing creative solutions that will easily fuse creativity with functionality, with long-lasting effects.


