
In this guide, I’ll explore how you can easily add a video to your Webflow project to enhance user engagement and provide a richer online experience.
Benefits of Using Videos in Web Design
1.The quick visibility of videos enables viewers to spend additional time exploring website pages.
2.Videos shorten explanation times more efficiently than typical text presentation
3.Video content delivers contemporary appearance that brings more user engagement to websites.
4.The visual content demonstrates trust through presentations of authentic human elements together with genuine life scenarios.
5.A video serves wonderfully for both storytelling purposes and emotional engagement.
6.These video formats function properly on mobile devices as well as desktop computers.
7.Videos increases search engine optimization ratings as long as they have proper descriptions along with appropriate usage.
Adding a Video in Webflow: Step-by-Step Guide:
Step 1: Choose Your Video
Choose your website video from YouTube Vimeo and local files including MP4 storage Treat the video selection based on content alignment while retaining professional appearance to maximize audience attention.
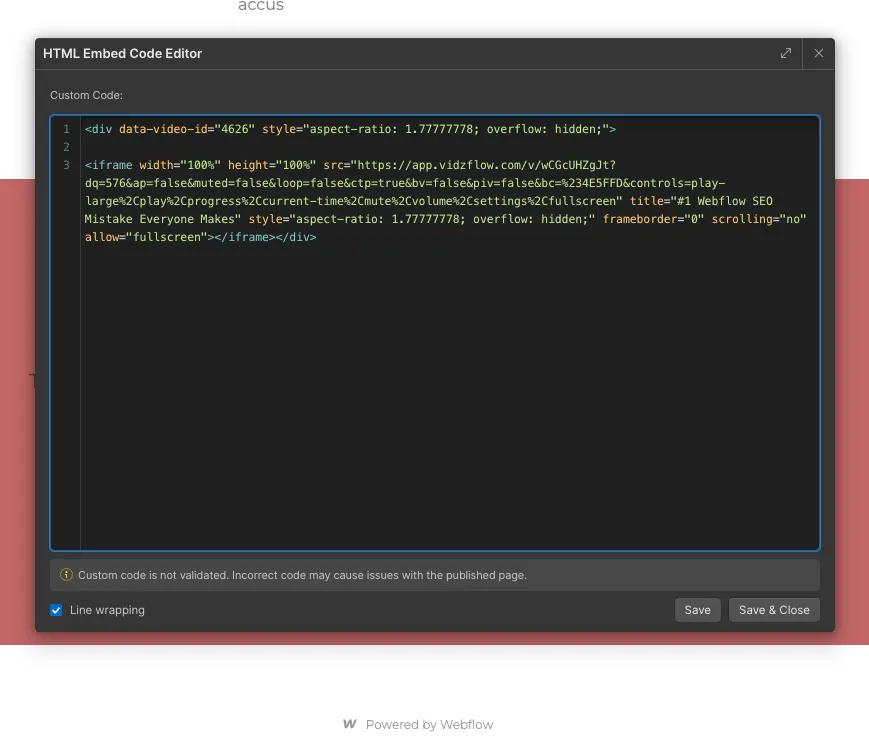
Step 2: Using the Embed Element
Locate the Embed element through the Add panel in Webflow then place it on your desired page area finally add your video embed code from YouTube Vimeo or Wistia into the Embed code box to let unsupported videos play along with detailed control over your video presentation
Step 3: Embedding a Video
To incorporate the video select the Embed element from the elements list in Webflow later enter your video platform embed code in the code editor The embed code usually appears under the share options of videos (located by pressing YouTube's "Embed" button) Save your work after embedding the code to see the video on your page Then modify its size and placement using the standard element tools on the page
Step 4: Customizing Your Video
You can personalize the video element after its embedded placement in order to achieve design consistency. Control all aspects of the video's appearance from the Style panel by adjusting the dimensions along with the spacing measurements. Borders alongside shadows enable users to make video elements stand out. To position the video relative to other content you should apply a grid or flex layout system for proper alignment. Video autoplay and looping features along with mute settings are easily controlled when the video supports these functions. Run testing to verify that your design maintains an attractive appearance on desktop screens as well as mobile devices.
Step 5: Publishing Your Site
After you finalize the video appearance alongside its site functionality you can proceed with the publishing process. Use the Publish button which appears at the right side upper area of the Webflow editor interface. Pushing your modifications through this action will display them on the active site. To verify your video works correctly you need to check its appearance and functionality in a browser following the publishing step. Your video becomes available for viewing as your visitors watch it since you have successfully published it.
Embedding Videos to Webflow with No Code Using Vidzflow
1.Sign Up for Vidzflow
Open a Vidzflow platform account to link this service with your Webflow project.
2.Choose Your Video
Through Vidzflow you can either upload your video content or search among YouTube and Vimeo platform videos.
3.Generate Embed Code
Vidzflow produces a unique embed code from your video that allows easy addition to your Webflow project design.
4.Embed the Video in Webflow
The Embed element is present in Webflow projects so you can drag it onto your selected page before adding the Vidzflow embed code.
5.Customize the Video
Vidzflow enables you to modify video playback options including autoplay and looping together with other settings without needing any code. The site design features can be modified to match your site requirements.
6.Publish Your Site
It is time to publish your site once the video reaches your satisfaction level.
Best Practices for Video Integration
1.Optimize Video Size and Format
The video should use MP4 format with optimized compression that maintains quick page load times. Large videos create a slowdown in website speed that creates a negative effect on user experience.
2.When using background videos enable autoplay mode with muted audio.
Background videos should be set to autoplay with mute activated to prevent distracting users with media noise. The video fits into your design without any break in the sequence because of this technique.
3.Every call to action in the video must be explicit and easily identifiable by viewers.
Your video needs clear calls to action when you target visitor engagement or conversion so place visible CTA buttons adjacent to the video containing texts such as "Learn More" or "Buy Now". Users should find it simple to proceed with a next action after finishing the video.
4.Ensure Mobile Responsiveness
Verify that your video playback gives excellent quality visual presentation across mobile platforms. Test the video layout to verify proper screen size adjustment which prevents performance degradation on reduced screen sizes.
5.Provide Captions and Transcripts
Users with hearing impairments will benefit from video captions as well as accompanying transcripts. Inclusion accessibility improves through video captioning which enables text-intending users or people with hearing difficulties to benefit from your content.
6.Host Videos on Reliable Platforms
Before embedding a third-party video through websites like YouTube or Vimeo check their overall reliability and confirm videos load without any difficulties. Hosting videos on your own website becomes necessary when these conditions arise.
7.Limit Video Length
The length of your videos should remain brief. A video length exceeding the recommended timeframe will make visitors casually disengage from the content. Conduct concise communication of essential content.
8.Use Thumbnails for Playable Videos
You should display an intriguing thumbnail visual for playable videos because this will qualify viewers to press the play button.
9.Test Page Speed
Your website speed must not diminish whenever you add videos to it. Your website performance can be checked through Google PageSpeed Insights and you should make changes in response to detected issues.
10.Make Videos Skip-able or Controllable
Users should be able to stop videos containing essential information and have volume control as well as skip options. Users experience enhances when they gain control over a system.
Conclusion
The process of adding videos to Webflow remains straightforward because users can choose from multiple suitable options. The built-in Video element enables users to embed YouTube and Vimeo videos while users who want to upload background videos have two options to create their desired design. Through the Embed element users can add video code from alternative platforms in order to gain extra control. Users who seek a no-code embedding solution should consider Vidzflow as their option. After adding videos to your site you can modify their dimensions and position alongside settings to suit your website design. An optimized video performance for quick loading and mobile adaptation should be implemented to provide visitors with an outstanding experience.
FAQ'S
How To Add Video To Webflow
Webflow enables users to add background videos through their platform.
You can embed a video by using the Embed element according to these steps.
Webflow users should select MP4 as their recommended video format.
Is there any way to modify the dimensions of videos inside Webflow’s framework?
We make websites that bring joy and meet your goals.
We create digital experiences that not only capture the users but also empower businesses in a highly competitive world. We are dedicated towards developing creative solutions that will easily fuse creativity with functionality, with long-lasting effects.

